
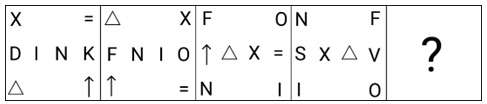
Select the figure from among the given option that can replace the question mark (?) in the following series.
- (a)
- (b)
- (c)
- (d)
Answer
Why
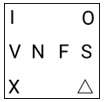
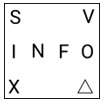
Correct — D. Each figure holds eight symbols: one in each of the four corners, and four more across a middle row.
The four figures read:
1 — corners X, = on top and triangle, arrow below, middle row D I N K
2 — corners triangle, X on top and arrow, = below, middle row F N I O
3 — corners F, O on top and N, I below, middle row arrow, triangle, X, =
4 — corners N, F on top and I, O below, middle row S X triangle V
Rule: on this step the corner group and the middle-row group change places, exactly as they did from figure 2 to figure 3. The route, read off that step, is:
middle row left to right goes to the corners anticlockwise from the top left — 1st to top-left, 2nd to bottom-left, 3rd to bottom-right, 4th to top-right
corners read clockwise from the bottom left fill the middle row left to right — bottom-left, top-left, top-right, bottom-right
Apply it to figure 4: S to the top left, X to the bottom left, triangle to the bottom right, V to the top right, and the corners N, F, I, O fill the middle row as I N F O.
That is option (d): S and V on top, X and triangle below, I N F O across the middle.
Why the others are wrong
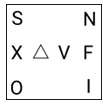
- (a)It leaves X, triangle and V in the middle row, where they already sit in figure 4. At an exchange step every middle-row symbol has to move out to a corner.
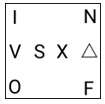
- (b)Nothing changes group: N, F, I and O are still in the corners and S, X, triangle, V still in the middle. That is the rotation step the series runs on the odd moves, applied one move too late.
- (c)Half an exchange: X and triangle do reach the corners correctly, but S and V stay in the middle row and I and O never leave the corners.
Concept
The strip alternates two operations. From figure 1 to figure 2, and again from figure 3 to figure 4, the four corner symbols turn one place clockwise. From figure 2 to figure 3 the corner group and the middle-row group trade places.
Figure 4 to the answer is therefore a trade, and the exact routing can be copied from the trade already on the page rather than guessed.
Two symbols also retire and two new ones enter at each turning step — D and K leave and F and O arrive between figures 1 and 2, and the arrow and = give way to S and V between figures 3 and 4. The trade step moves symbols instead of replacing them, so the answer uses figure 4's eight symbols and no others.
All four options carry the same eight symbols as figure 4, so the item is decided entirely by where each symbol sits. Reading the figure 2 to figure 3 exchange carefully is faster than testing a rotation on all four.
Key facts
- Figure 4 has N and F across the top, I and O across the bottom, and S X triangle V through the middle.
- In the figure 2 to figure 3 exchange, the middle row F N I O landed at top-left, bottom-left, bottom-right and top-right in that order.
- The corners of figure 2, read clockwise from the bottom left as arrow, triangle, X, =, became the middle row of figure 3 in that order.
Study next
Common traps
- Assuming every step of a figure series repeats the same operation
- Rotating the corners because that is what worked from figure 3 to figure 4
- Checking the corners and ignoring the order of the middle row
The stem — 'Select the figure from among the given option that can replace the question mark (?) in the following series' — names the task but describes nothing in the pictures, so the transformation has to be read off the figures.
Reasoning Q.10 of this same 18 Sep 2024, 16:00 paper is another figure series worked by a different rule: a three-entry window on one running list slides one place from box to box, and nothing moves inside a box.
Related PYQs
No directly related past PYQ was found.