
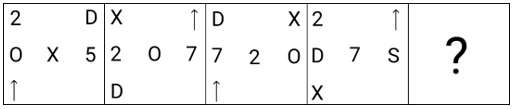
Which figure should replace the question mark (?) if the following series were to be continued?
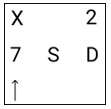
- (a)
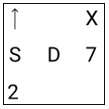
- (b)
- (c)
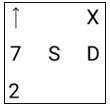
- (d)
Answer
Why
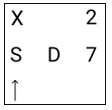
Correct — D. Every box uses the same six cells: two in the top row at the left and right corners, three across the middle row, and one at the bottom left. The symbols move between those fixed cells.
Rule: the middle row shifts one cell to the right, the right-hand symbol wrapping round to the left.
Rule: the outer three cycle top-left to top-right to bottom-left and back to top-left.
Figure 4 reads: 2 top-left, an up-arrow top-right, D 7 S across the middle, X bottom-left.
Apply the middle-row rule to Figure 4:
D 7 S becomes S D 7
Apply the outer rule to Figure 4:
2 moves from top-left to top-right
the up-arrow moves from top-right to bottom-left
X moves from bottom-left to top-left
That gives X top-left, 2 top-right, S D 7 across the middle and the up-arrow bottom-left, which is option (d).
Why the others are wrong
- (a)Option (a) gets the outer cycle right, with X top-left, 2 top-right and the arrow bottom-left, but runs the middle row leftwards, printing 7 S D instead of S D 7.
- (b)Option (b) has the middle row right at S D 7 but reverses the outer cycle, putting the arrow top-left, X top-right and 2 bottom-left instead of X, 2 and the arrow.
- (c)Option (c) fails on both movements: the outer three run backwards and the middle row shifts left, so it repeats the error in (a) and the error in (b) together.
Concept
Symbol-position series keep the cells fixed and move the contents. Write the layout down first, then track one symbol at a time across the four given figures.
Track the up-arrow. It sits bottom-left in Figure 1, top-right in Figure 2, bottom-left in Figure 3 and top-right in Figure 4, so it swings between just two cells. That single observation shows the outer symbols are on a short cycle.
Then read the middle row across the figures and you have the second half of the rule. The option set is built to punish getting one half right and the other half backwards.
The series alternates between two different movements.
Figure 1 to Figure 2, and Figure 3 to Figure 4, move the symbols one way and also replace the middle-right symbol: a 5 becomes a 7, then an O becomes an S.
Figure 2 to Figure 3 moves every symbol and replaces nothing, and that is the movement the answer repeats.
Key facts
- Each box uses six cells: two top corners, three across the middle, one at the bottom left.
- Figure 4 holds 2 top-left, the arrow top-right, D 7 S across the middle and X bottom-left.
- Option (d) holds X top-left, 2 top-right, S D 7 across the middle and the arrow bottom-left.
- On the Figure 2 to Figure 3 step every symbol moves and none is replaced.
Study next
Common traps
- Shifting the middle row left instead of right, which lands on option (a)
- Running the outer cycle backwards, which lands on option (b)
- Reading the rule off the Figure 3 to Figure 4 step, which is the alternate movement
The stem, asking which figure should replace the question mark if the series were continued, also carries picture series at 9 Sep 2024, 16:00, Reasoning Q.22 and at 10 Sep 2024, 09:00, Reasoning Q.3.
Related PYQs
No directly related past PYQ was found.